Tag: madewithlove

  • Let’s Make Lighted Camping Buckets!

    Let’s Make Lighted Camping Buckets!

    We Sleep Around, Lighted Camping Buckets, Backyard Sign Cricut Silhouette, Svg/Dxf/Png/Eps/Sublimation, Digital Download, Cut File

    With camping and backyard outings upon us lets make some fun lighted camping buckets!! I have 2 fun files for you. One for my camping friends and the other for my backyard friends. The We Sleep Around File has a WE and an I version so you could make a fun shirt or sign too!!! Don’t camp?? Don’t worry, I don’t either! I made a fun Welcome to Our Backyard sign\bucket for you too!!! This is a fun and fast project!!! Let grab our supplies and get going!

    Also, until June 1st enjoy 25% off everything in the shop!!!

    We Sleep Around – Welcome to our Back yard

    Camping Bucket Supply list

    Video TutorialCamping Buckets

    Here are the steps I took to make the Camping Buckets

    Step 1 – Lets prep our Buckets! Scrape the stickers off the lid and the bucket. I used a scrapper to get mine off. I found if i could lift a section and then get under I could lift the sticker off and remove. Use the acetone and cotton pad to remove any residual parts. Once that is done use the Alcohol and a pad to clean and prep your surface. Set aside to dry.

    Step 1 – Now load your free file into your cutting software and cut it out in your vinyl of choice. For the camper I went vintage colors with turquoise and pink.

    Step 3 – Now to weed our vinyl

    • Start with weeding vinyl – I find a pin pen helps to remove the small pieces of vinyl from the center of the words. I also like to use weeding boxes too.
    • Apply transfer tape for the camper I started with the outline first
    • Peel off vinyl backing from the words
    • Now use parchment paper and attach it to the back of the camper. Make sure you leave some transfer tape showing to attach it to the next layer. Now use parchment and camper to line it up on the stripe and words. Once you have it where you want. Push down the transfer tape and hinge method to pull the parchment out. Squeegee down your vinyl.
    • Pull the vinyl backing from the offset
    • Repeat to add the drapes
    • Apply your design to your bucket. I use a taco method, where I curved it up and touched the middle of the design to the bucket. Squeegee image down.
    • Remove transfer tape. Remember to keep the transfer tape close to your image.

    Step 4 – Assemble and add your light. You could use double sided tape or hook and loop if you want your light to stay in one spot.

    Step 5 – Play with the fun lights and enjoy!!!

    How to get your FREE Sweet Land of Liberty Files

    To get your FREE file please go to my Freebie Library, sign in (don’t worry if you are not a member yet, sign up and the password will be emailed to you!!! Also, remember I include it in the bottom of the weekly email too! 😉 ) and download Number 34 – We Sleep Around and/or Welcome to our Backyard. The downloaded file will have multiple file options SVG, PNG, DXF (If you have the free version of Silhouette Studio you will need this file) and EPS. 

    I hope you enjoy the FREE tiered tray file. Thank you again for stopping by and being part of my dream and 12 Paw Designs! Have an absolutely amazing day!!!

    Remember to PIN IT!!! ?

    We Sleep Around, Lighted Camping Buckets, Backyard Sign Cricut Silhouette, Svg/Dxf/Png/Eps/Sublimation, Digital Download, Cut File
    12PD Camper and Backyard Bundle

    Also, please check out my shop. I am always adding new designs.
    https://12pawdesigns.com/shop/

    If you have any questions or run into an issue please let me know!!!

    Lorri?
    Lorri@12PawDesigns.com

    Let’s Conntect!

    Want to connect more with 12 Paw Designs???:
    • Website: https://12pawdesigns.com
    • FB Page: https://www.facebook.com/12pawdesigns/
    • Instagram: https://www.instagram.com/12pawdesigns/
    • Pinterest: https://www.pinterest.com/12PawDesigns

    DO NOT resell any of the files as digital download or any other form.
    DO NOT claim the files as your own.
    DO NOT modify and resell the files in any form.
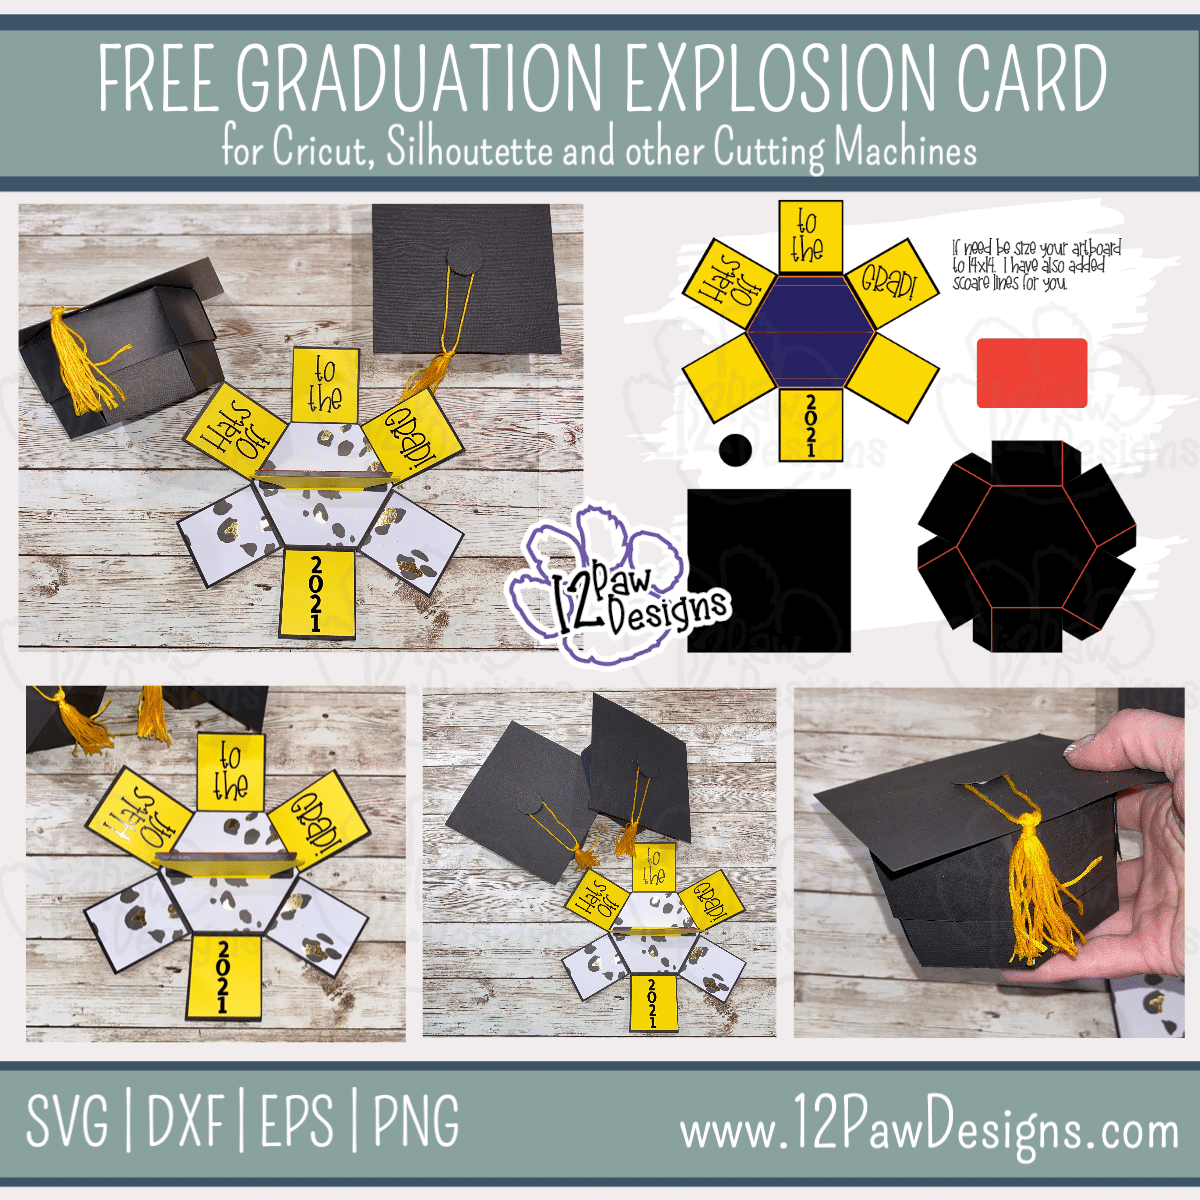
  • Exploding Graduation Gift Card Holder

    Exploding Graduation Gift Card Holder

    12PD Graduation Gift Card Explosion Box

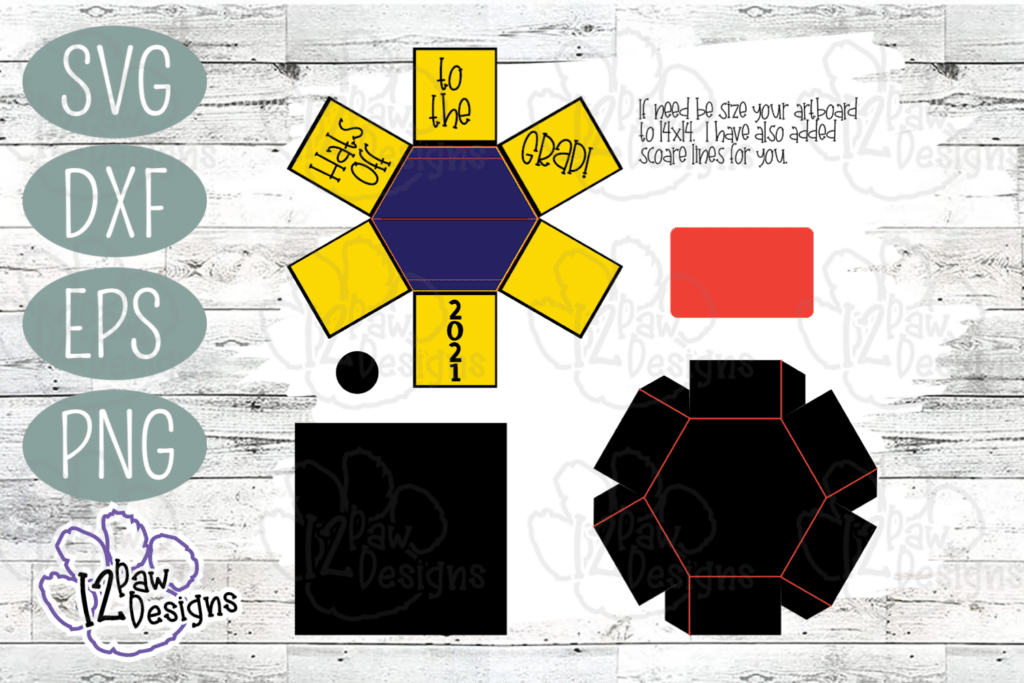
    EXPLODING GRADUATION GIFT CARD HOLDER! This year we have two amazing young women graduating from college. I wanted to make a card, however, not just any card I thought..hmmm…..what about and Exploding Graduation Card??? So I thought I would share it with you.

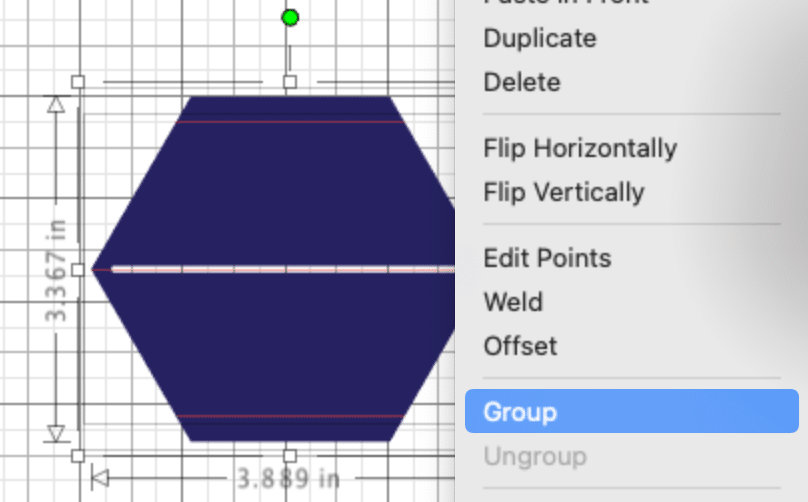
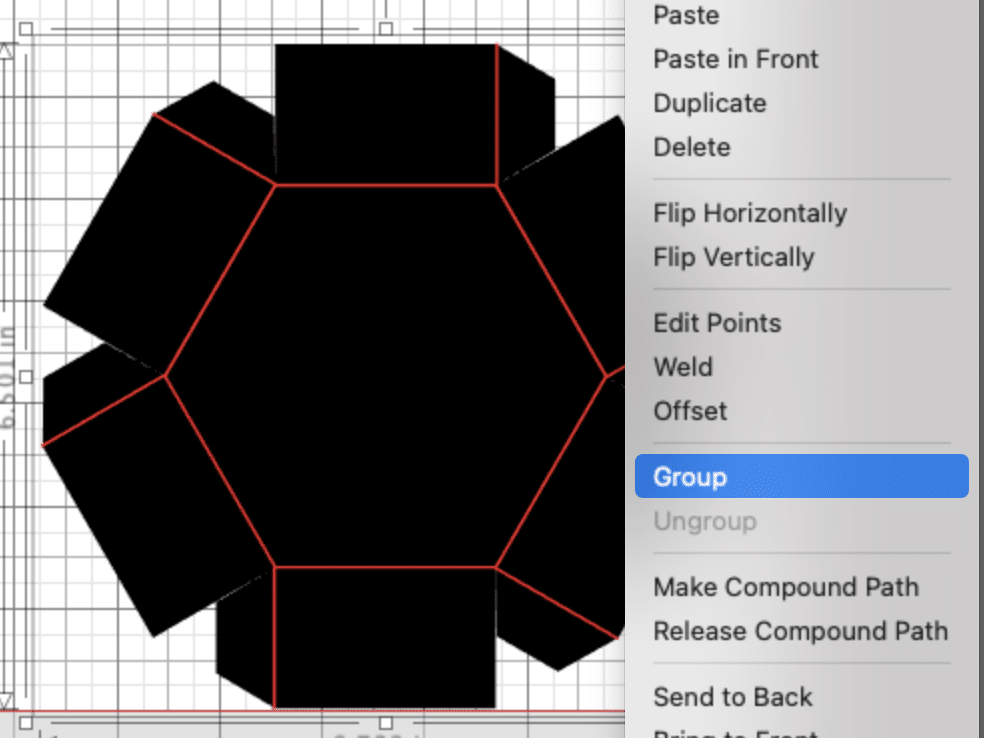
    I even designed the file with score marks in. So it goes fairly quickly to assemble. My Cricut users will see the score option when you import the SVG file. My Silhouette users will need to do a quick group on the score lines and the layers and you will be good to go! I have also setup the file so you can use 8 ½ x 11 or 12. I also made the tassel and show you quick and easy it is.

    This weeks FREE SVG/Cut files can be found in the Freebie Library. File number is 29. I have also created a video tutorial along with some quick directions below on how I made the gift card holder. Have fun and share your creativity! I would love to see the color choices you used!

    Graduation Gift Card Holder Supply List

    • Cutting Machine and software
    • Exploding Graduation Gift Card Holder (click on the link)
    • Card stock of your choice – I used
      • Black Textured Cardstock – You can choose their school colors
      • Yellow Cardstok – Again, use school colors
      • Pattern Cardstock of choice
    • Black Vinyl
    • DMC Floss – For making the tassel
    • Weeding tools, scissors, cutting knife, transfer tape, foam dots or tape, and adhesive of choice

    Video TutorialHow to make the Gift Card

    Here are the steps I took make the Graduation Gift Card Holder

    Step 1 – Open the SVG file in your cutting software (note: if you have the free version of Silhouette studio you will need the DFX files). Make sure the size comes in as 14×14. If not size it accordingly before doing anything. Cricut users I have the score lines set for you so when you import they will be there. Silhouette users you will need to group the score lines with the object. The objects below are the one you need to do. I put the score lines in red for you. The 3 vertical lines attach to the blue gift card holder. Then the other red lines are for the box top and the box bottom. Also for Silhouette users i used a blade of 1 and a force of 4 for the score lines. Note: if you are using textured card stock i would put the texture to the mat so that the score happens on the back side. Cricut users if you do not have a score blade its ok, use a ruler to help bend them up. Cut your material.

    Step 2 – Box bottom – After everything is cut out weed your vinyl words. Then take the box bottom and bend the flaps back and forth it will help with the “explosion”. We want to attach the gift card holder piece first. Fold it in half and the fold at the tabs. Add your adhesive and attach. You want to keep the 2 sides close to each other so that the gift cards holds in there. Plus your pattern paper has to go over the top. So one the gift card holder is in place attach your decorative piece over it to hide the tabs. Next attach your panels to the flaps. I used for solid colors for the words and 2 patten pieces. However, you can do all solid colors. Once that is done use your transfer tape and lay down your words to the card.

    Step 3 – Box Top – Now fold the box top panels in and the tabs. Add your adhesive to the tabs and attach to the panel next to it. This will form the box top.

    Step 4 – Attach the mortar board to the top of the box top with your adhesive. Then attach the button to the mortar board with a foam square.

    Step 5 – Tassel – Lets make the tassel. They are quick and easy to do. I use embroidery floss to make mine. I took the floss and wrapped it around 3 fingers 10 to 12 times. Then I slide the hanger piece of floss through the circle of floss. Now, take a smaller piece of floss and wrap it around your floss bundle. Keep it towards the top of the bundle by your hanger piece of floss. I wrapped it around the floss bundle 3 or 4 times and then pulled it tight and tied a knot. Trim up you edges and cut the ends on the bundle opposite from the hanger. You know have a super cute tassel!

    Step 6 – Attach your tassel. Make sure your box is put together so you can place your tassel appropriately. On the hanger strand I flipped the ends over 1 time, then put it under the button. Then I checked the length and position. Once i was happy with that i finished the knot. Now look at how cute your box is!!!! I hope you have a grad at any level to share this cute gift with!!!

    How to get your FREE Files

    To get your FREE file please go to my Freebie Library, sign in (don’t worry if you are not a member yet, sign up and the password will be emailed to you!!! Also, remember I include it in the bottom of the weekly email too! 😉 ) and download Number 29 – Graduation Exploding Gift Card. The downloaded file will have multiple file options SVG, PNG, DXF (If you have the free version of Silhouette Studio you will need this file) and EPS. 

    Enjoy the gift holder! I hope you have a grad you can share it with! They were a lot of fun to design and make. Remember a ? Pinterest pin would be so appreciated! I can’t wait to see what you create. Please share with me. You can come back here and add a comment or add one to Facebook too!

    Also, please check out my shop. I am always adding new designs. You might also find ready made tumblers in there in the future!!! There might be a few extra keychains that show up there too!!
    https://12pawdesigns.com/shop/

    If you have any questions or run into an issue please let me know!!!

    Lorri?
    Lorri@12PawDesigns.com

    Let’s Conntect!

    Want to connect more with 12 Paw Designs???:
    • Website: https://12pawdesigns.com
    • FB Page: https://www.facebook.com/12pawdesigns/
    • Instagram: https://www.instagram.com/12pawdesigns/
    • Pinterest: https://www.pinterest.com/12PawDesigns

    DO NOT resell any of the files as digital download or any other form.
    DO NOT claim the files as your own.
    DO NOT modify and resell the files in any form.

  • Time to Make the Mandalas!

    Time to Make the Mandalas!

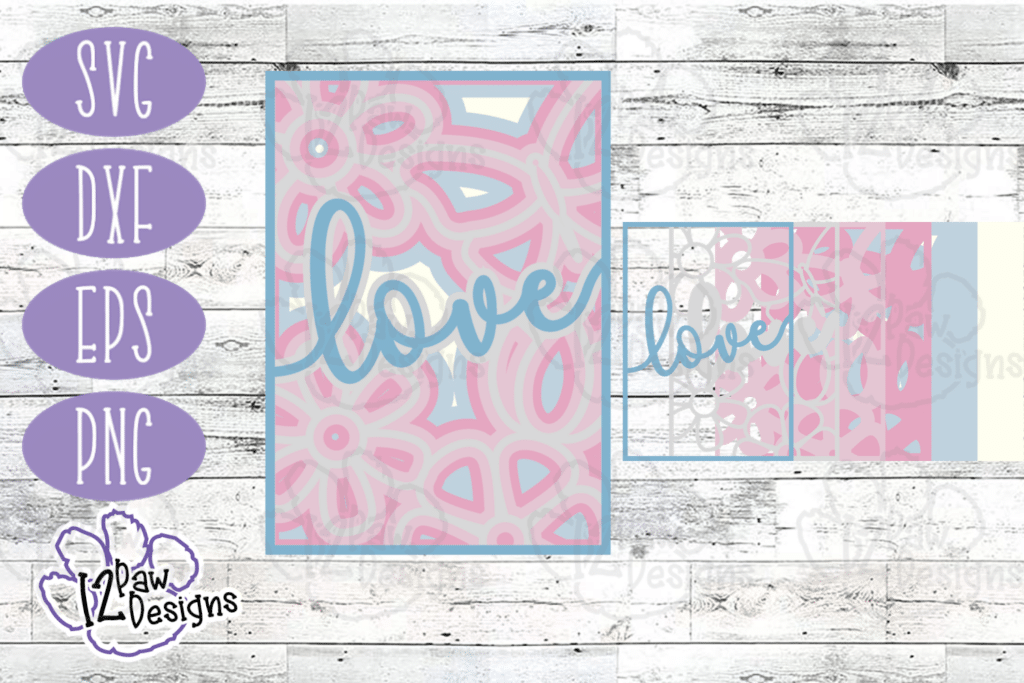
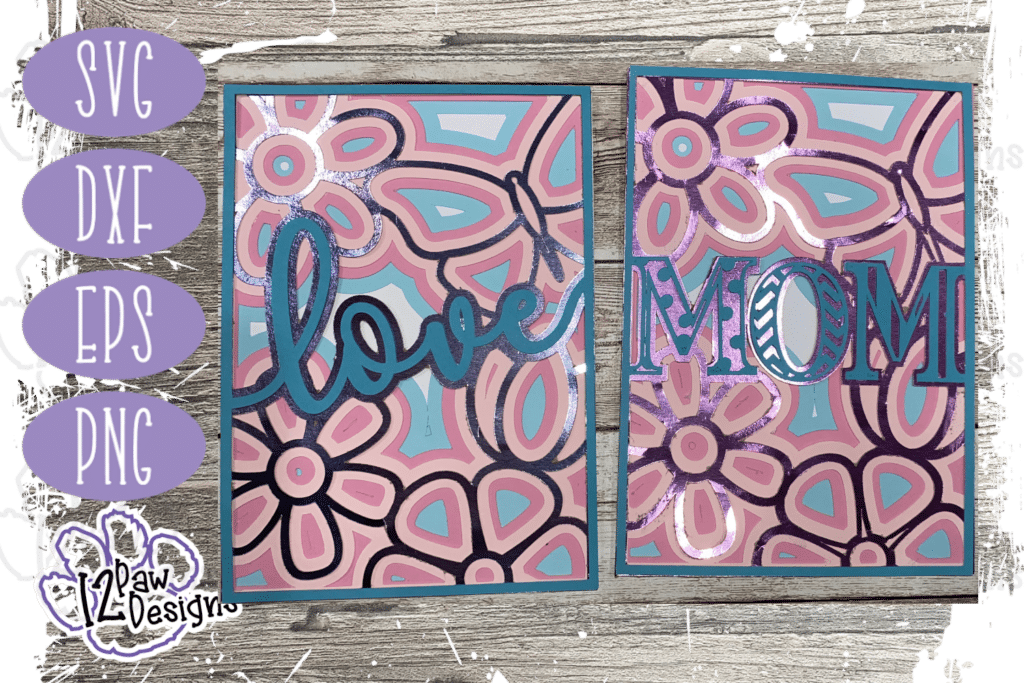
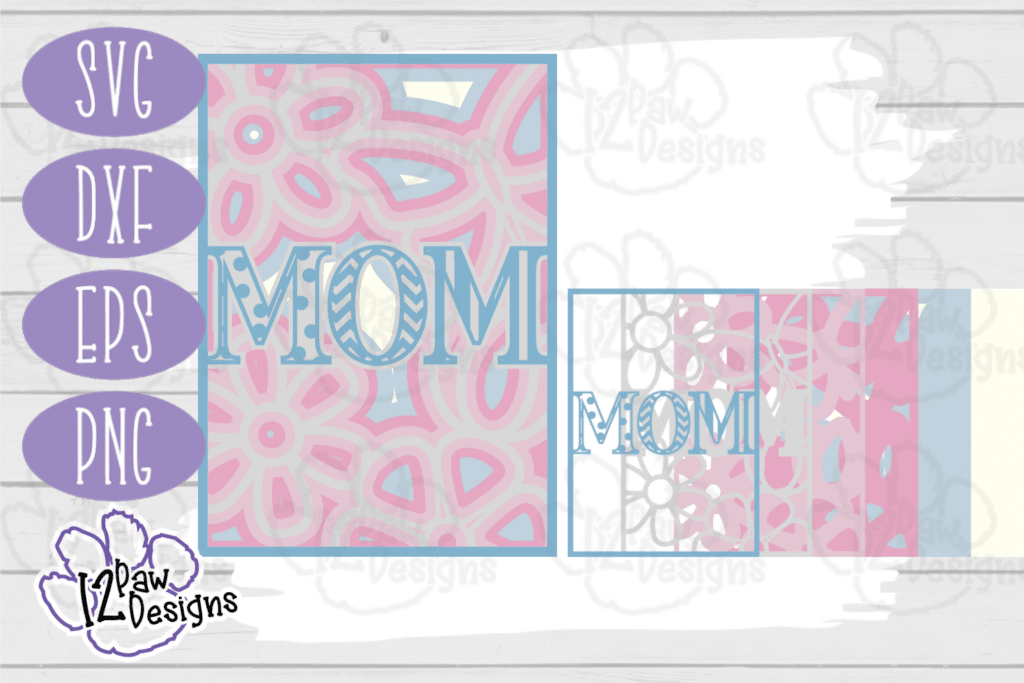
    Mandalas MOM LOVE 5x7 FREE

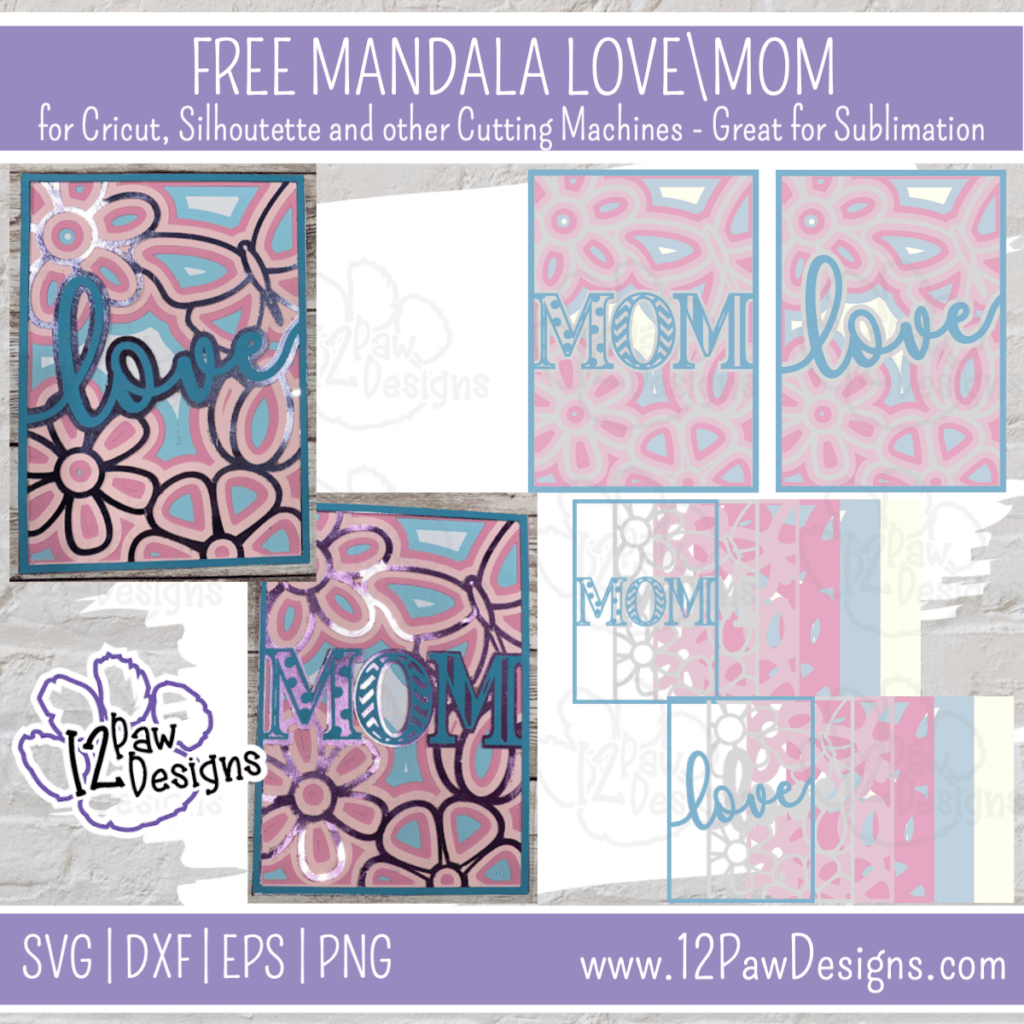
    TIME TO MAKE THE MANDALAS! That’s right this week not only do I have one Mandala to share I have two!!!! I designed a Mom and Love file and I used them to make cards. With Mother’s Day around the corner I thought you might need a card. Then it’s that time of year for weddings, anniversaries, etc so the love card will come in hand. Or…surprise your significant other!!

    The mandalas have 6 layers to them. However, the bottom layer is solid so I just used my card base for it. If you need a different color you can cut that out too!! I used some beautiful Recollections Paper from #michaelstores. They had a really fun foil cardstock I used for the second layer that really made Mandala pop!

    This weeks FREE SVG files can be found in the Freebie Library. File numbers are 26 and 27 I have also created a video tutorial along with some quick directions below on how I made the cards. Have fun and share your creativity! I would love to see the color choices you used!

    Time to Make the Mandalas Supply List

    Video TutorialTime to Make the Mandalas

    Here are the steps I took make the Mandalas

    Step 1 – Open the SVG file in your cutting software (note: if you have the free version of Silhouette studio you will need the DFX files). The files should come in at 5×7. However, if you need to resize them just put them to 5×7 and you are good to go! Make sure all your pieces are cut before ejecting from the cutting machine.

    Step 2 – After everything is cut go ahead and weed your cardstock. One think to note: On the Mom file the O is separate. So make sure you grab that too!

    Step 3 – Once you have your cardstock layers all set to go lets assemble the cards. Using your adhesive of choice, I used a tape runner, attach the layers to each other. If you want a more 3D effect you can use foam squares. These are going in the mail so I choose not to do that part. The easiest is to start from the bottom up. So take your card base and cut that 7 by 10 and fold in half to get a 5×7 card. Then attach layer your bottom layer to the card. Then attach the next layer and so on until you have it all assembled. If you are doing the Mom card make sure to attach the O. 😉

    Step 4 – Admire what a great job you did and share it with someone special!!!

    How to get your FREE Files

    To get your FREE file please go to my Freebie Library, sign in (don’t worry if you are not a member yet, sign up and the password will be emailed to you!!!) and download Number 26 Mom Mandala or 27 Love Mandala. Or heck! Download them both!!!! The downloaded file will have multiple file options SVG, PNG, DXF (If you have the free version of Silhouette Studio you will need this file) and EPS. 

    I hope you enjoyed Mandalas tutorial and files! They were a lot of fun to design and make. Remember a ? Pinterest pin would be so appreciated! I can’t wait to see what you create. Please share with me. You can come back here and add a comment or add one to Facebook too!

    Also, please check out my shop. I am always adding new designs. You might also find ready made tumblers in there in the future!!! There might be a few extra keychains that show up there too!!
    https://12pawdesigns.com/shop/

    If you have any questions or run into an issue please let me know!!!

    Lorri?
    Lorri@12PawDesigns.com

    Let’s Conntect!

    Want to connect more with 12 Paw Designs???:
    • Website: https://12pawdesigns.com
    • FB Page: https://www.facebook.com/12pawdesigns/
    • Instagram: https://www.instagram.com/12pawdesigns/
    • Pinterest: https://www.pinterest.com/12PawDesigns

    DO NOT resell any of the files as digital download or any other form.
    DO NOT claim the files as your own.
    DO NOT modify and resell the files in any form.

  • Time for Some Teacher Appreciation!

    Time for Some Teacher Appreciation!

    12PD Teacher Appreciation

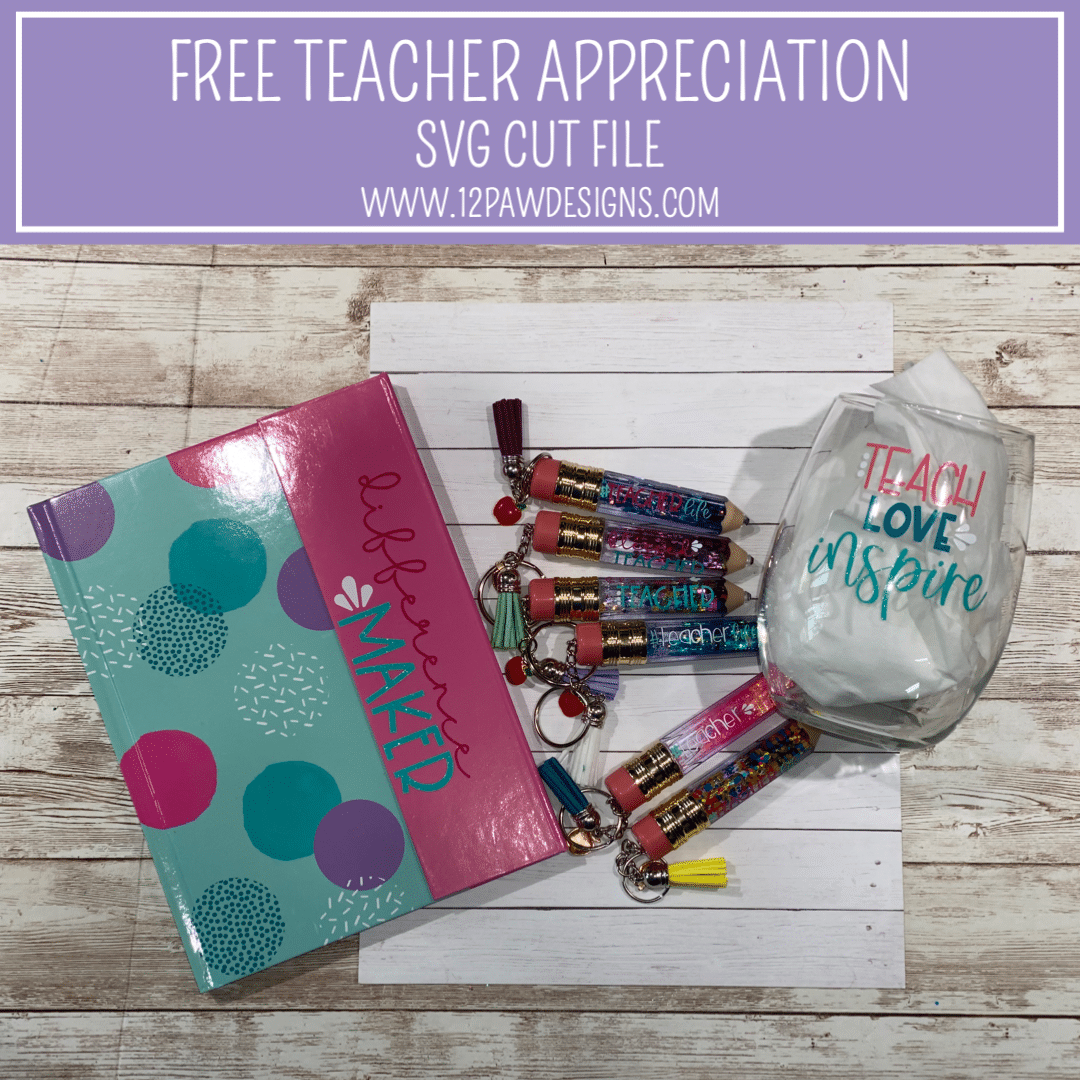
    TIME FOR SOME TEACHER APPRECIATION! It’s that Time of year where we need to show our Teachers some Appreciation! This weeks FREE SVG can be found in the Freebie Library. In the file there are 5 options for you. Two of the options can actually be used for a teach gift or something else. I have also created a video tutorial along with some quick directions below on how I made the journal, the adorable pencil keychains and the wine glass. I picked up the journal at Dollar General and the wine glass as Dollar Tree. The keychain supplies will be in the supply list below. Also in the video I talk about some other ideas for some more gifts for your favorite teacher along with possible for mom! I start the video off with this, then we make the journal, the keychains and finally the wine glass. Let your creative go and have fun with it. Have fun and share your creativity!

    I will also be adding a few new teach files in the store too!! There will also be some baseball and softball ones coming too!!!

    Teacher Appreciation Supply List

    Please note there are affiliate links in the supply list. There is no extra cost to you for using these links it just helps me to keep brining you free content! Thank you for your support,

    Time for Some Teacher Appreciation Video Tutorial

    Here is some Teacher Appreciation Ideas!

    Here are the steps I took make the Teacher Appreciation Gifts

    Step 1 – Open the SVG file in your cutting software (note: if you have the free version of Silhouette studio you will need the DFX files). Size the file elements as need for the project you are making. I used weeding boxes to help me weed my vinyl. This is especially important when doing the key chains. Cut your vinyl out. Make sure all your pieces are cut before ejecting from the cutting machine.

    Step 2 – I started with the journal and cut those pieces first. Then while the keychain vinyl was cutting I worked on the journal. Weed your vinyl. Once that is done take your transfer tape and apply it to the vinyl. Then I used parchment paper and applied my vinyl\transfer to that. Decided where i wanted it placed and then removed the parchment paper and squeegee down the vinyl. I did this same step for the second word and the applied my accents.

    Step 3 – Now for the keychains. I cut the wands off of the lip gloss tubes. Then I removed the eraser for the top. I took a small about amount of E6000 and applied it to the top and put the eraser back on the top. Let dry. I then took the baby oil and glitter (make sure your glitter is ready to use) I put the baby oil in the tube. Do not fill it up all the way. Then add your glitter. I used a piece of paper underneath to help with clean up. Now…there is such a thing as too much glitter!! You want them to galaxy float. Now decide if you need any more oil. I need a little air bubble at the top. The tubes I recommend have a plug that comes with them. BONUS! I put the plug in and then added some E6000 glue and put the cap on. You want to glue them shut to make sure you dont have an accident! Once this is done wipe your pencils with alcohol and cotton pad to get off any left over glitter and stuff. Let dry.

    Step 4 – Now weed your vinyl. Lessons learned. The bigger words you can weed easily. However, the smaller ones were a bugger! Reverse weeding did help a little, however, I applied the vinyl with weeding box to the pencil and then weeded it. Be careful not to scratch them though Once I figured this out it went relatively quickly.

    Step 5 – Now to finish the key chains. Take your needle nose and eye screw and attach it to the top. You want to make sure you go into the metal of the cap for good hold. I then opened the eye screw and fed in the key chain. Closed off the screw. Next take your jump ring and attach to the jump ring at the top. Add you tassel and apple charm. Close your ring. Now admire how stinking cute they are!!!

    Step 6 – Wine Glass. Cut out your vinyl. While that is cutting I took the glass, alcohol and the cotton pads and cleaned the glass. Let dry. Weed your vinyl. Once that is done I actually put the words together before applying to the glass. I used parchment paper again to line everything up. Then used parchment paper to apply the vinyl to the glass. Add your accents. How is is that!!! It’s so cute and fun!!

    How to get your FREE Files

    To get your FREE file please go to my Freebie Library, sign in (don’t worry if you are not a member yet, sign up and the password will be emailed to you!!!) and download Number 25 Family Word Search. The downloaded file will have multiple file options SVG, PNG, DXF (If you have the free version of Silhouette Studio you will need this file) and EPS. 

    I hope you enjoyed this tutorial and thank you again for stopping by and being part of my dream and 12 Paw Designs! Have an amazing week! Remember a ? Pintrest pin would be so appreciated! I can’t wait to see what you create. Please share with me. You can come back here and add a comment or add one to Facebook too!

    Also, please check out my shop. I am always adding new designs. You might also find ready made tumblers in there in the future!!! There might be a few extra keychains that show up there too!!
    https://12pawdesigns.com/shop/

    If you have any questions or run into an issue please let me know!!!

    Lorri?
    Lorri@12PawDesigns.com

    Let’s Conntect!

    Want to connect more with 12 Paw Designs???:
    • Website: https://12pawdesigns.com
    • FB Page: https://www.facebook.com/12pawdesigns/
    • Instagram: https://www.instagram.com/12pawdesigns/
    • Pinterest: https://www.pinterest.com/12PawDesigns

    DO NOT resell any of the files as digital download or any other form.
    DO NOT claim the files as your own.
    DO NOT modify and resell the files in any form.